We've moved!

You will be automatically redirected to the new address. If that does not occur, visit
http://www.techimperial.com
and update your bookmarks.

Showing posts with label google voice. Show all posts

Monday, December 12, 2011

Free iPhone WiFi Calls

How to setup free Wifi Calling on your iPhone with Vonage & Google Voice

Free iPhone Calls through Wifi with Vonage® Mobile and Google Voice™ apps.

Ever wondered how to make and receive free calls on your iPhone? I did. I wondered about how I could possibly get away with making free WiFi calls and receiving them. I found a nice solution to my question and my curiosity, the following will explain how this works and what you must do to be able to make free WiFi calls.

There have been many methods brewed up by random people online here and there in the past, such as using a Gizmo5™ account or more advanced SIP numbers. Those methods are now outdated, Google™ bought Gizmo5™, you can no longer register for a Gizmo5™ account. The SIP numbers come with a price tag now and it just doesn't feel right.

This new method uses the Vonage™ and Google Voice™ apps to make and receive free WiFi calls. This only works in the United States, since Google Voice™ is only available to US Residents, Vonage™ only allows free WiFi calls to numbers in the US as well.

Requirements
iPhone (Hardware)
Computer Headset (Hardware)
Vonage Mobile (App)
Google Voice (App)
Google Chrome (Software)
Google Voice & Video Chat plug-in (Software)
Gmail account (Service)
Google Voice account (Service)

    Instructions
  1. Make sure you have the requirements installed, setup and ready to use, also plug your headset into the computer.
  2. From this point on, you should only be using the Chrome browser to do any Google related activities.
  3. Login to your Google Voice account, go to settings and enable "Google Chat" as a forwarding phone for calls. (If you do not see Google Chat followed by your Gmail e-mail, login to Gmail and place a brief call to your number, then refresh the Google Voice page, it should now be listed) 1
  4. Now make sure you have an open Gmail page with your account logged in. Make sure your settings resemble the ones on for this step's image. 2
  5. Open Vonage Mobile on your iPhone and setup an account using your Google Voice number as the phone you will use to verify the account.
  6. Vonage Mobile will place an automated call to your Google Voice number now and will require you to input a few digits to verify the number is yours, make sure your speakers are on and your Gmail account is open and ready for a call.
  7. Now that your Vonage Mobile account is verified and registered, you will be given a pop-up to purchase a Vonage Rate Plan, click Ok and exit the link it opens. (You do not need to purchase anything to make calls within the United States)
  8. Make sure you're on a WiFi network and place a call using Vonage Mobile, the party you are calling should see your Google Voice number as the caller I.D.
  9. You can now use the Google Voice app on your iPhone to send and recieve texts, get voicemails, view your Google contacts and check call logs, all through WiFi. (You must use Vonage Mobile to place calls through WiFi as the Google Voice app is not a VOIP client)
  10. Feel free to setup your Google Voice account to ring your iPhone's actual number in case you want to receive live calls. (Otherwise you'll just have to check your voicemails or missed calls through the Google Voice app)
  11. You have successfully configured your iPhone to place free WiFi calls and somewhat incoming calls, plus completely free texting and free voicemail with additional features all for free.


Wednesday, November 16, 2011

Free Texting on your iPhone with Google Voice, Tlert & SMS GV Extension

Free texting for the whole family with Google Voice™ on the iPhone!

I wanted to write about this awhile back, it's actually pretty cool, I didn't realize how easy it was to enable native texting (not using any 3rd party apps) with my Google Voice™ account on my iPhone, when I found out, I liked it, although I don't use it anymore, but if I ever had to, I definitely would.

This is a pretty simple procedure to follow and only requires installation of three apps, your iPhone must be jail-broken and you must have a data plan or WiFi connectivity. (You do not need to be jail-broken if you are fine with using the Google Voice™ app every-time you want to text someone, simply ignore all the steps and install Google Voice™ from the App Store)

You will need to have a Google Voice™ account in order to use this functionality. Follow the steps below if you want to be able to SMS without opening an app.

    Instructions
  1. First, you will want to install Google Voice™ from the official App Store.
  2. Now you must install an app called Tlert from Cydia it's in the ModMyi repository. Please keep in mind that Tlert is not free, it comes with a price of $6.99, if for some reason you cannot afford Tlert there is a legal patch you can grab through Banned iPhone repository. (If you use the patch you must make sure that Tlert is installed even as trial and then make sure Tlert is disabled before you install the patch and you have rebooted and re-enabled Tlert)
  3. After you have installed Google Voice™ and Tlert you should now be ready for the final steps, make sure you have the BigBoss repository installed on Cydia.
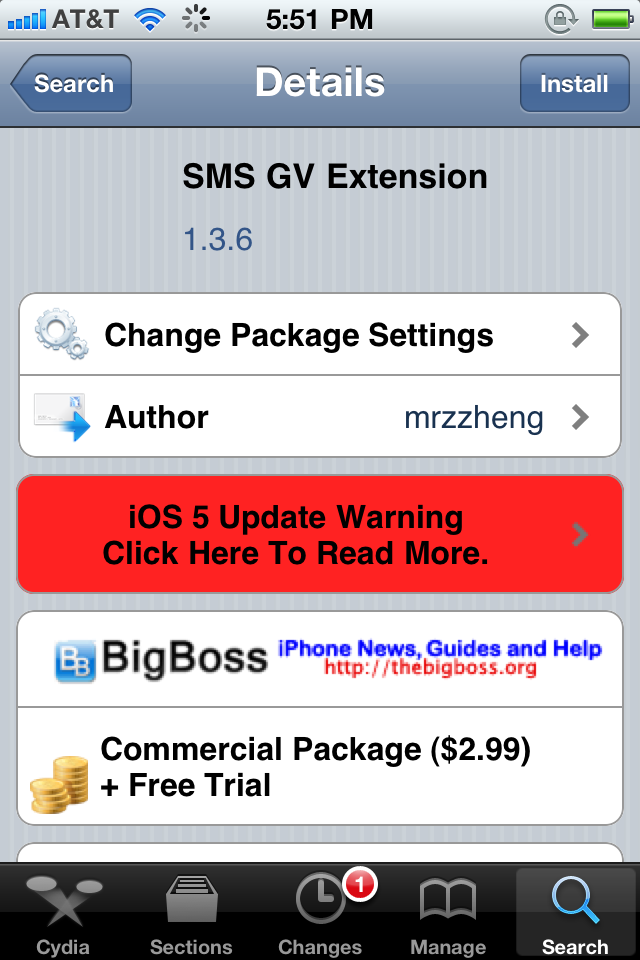
  4. Alright, open up Cydia and search for SMS GV Extension. It costs $2.99, it also includes a free trial, this adds Google Voice™ messaging capability to the device's SMS module. The website for it can be found here.
  5. Congratulations, you've completed all of the previous steps, you're going to want to optimize your settings now, look below to set everything up perfectly.

    Configuration
  1. Open Tlert, make sure enabled is toggled on.
  2. Now click on "Activate Compose", it'd be best to use the Volume Buttons "Down, Up" to send an SMS through Tlert, so check it and go back, then hit Apply.
  3. Now go to the Settings app, click on "Notifications", click on "Google Voice" and enable "Alerts".
  4. Finally go back to the Settings app and scroll down to "SMS GV Extension", click on it then input the e-mail address you use to login into Google Voice with password.
  5. Toggle "Enable Send" to on. Toggle "Check License" on. Click Receive Settings and Toggle "Official GV app" on, "Local Mail" off, "Refresh Cache" on.
  6. Now go back to Settings and re-spring your device.
  7. Open the "Google Voice" app and make sure the same account you used on "SMS GV Extension" is logged in through the app, you can now exit the app after logging in.
  8. Finally test it out, have someone text your Google Voice number and see for yourself.


If you have any problems figuring this out or installing any of the above, drop a comment and I'll be happy to help you out.